Pipelines
To build modern search pipelines with LLMs, you need two things: powerful components and an easy way to put them together. The Haystack pipeline is built for this purpose and enables you to design and scale your interactions with LLMs.
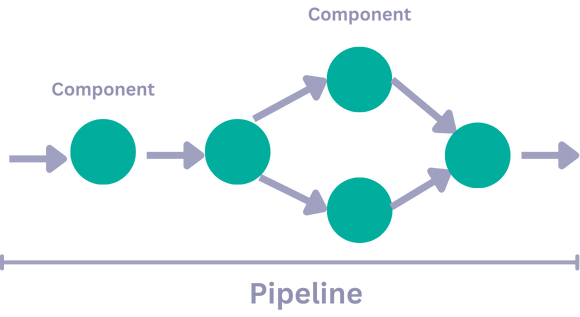
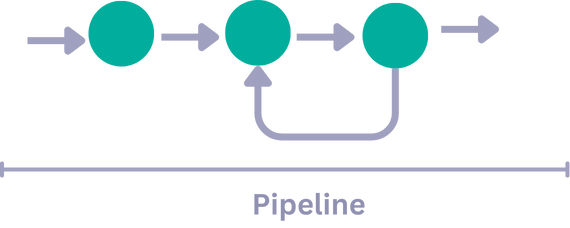
The pipelines in Haystack 2.0 are directed multigraphs of different Haystack components and integrations. They give you the freedom to connect these components in various ways. This means that the pipeline doesn't need to be a continuous stream of information. With the flexibility of Haystack pipelines, you can have simultaneous flows, standalone components, loops, and other types of connections.
Flexibility
Haystack 2.0 pipelines are much more than just query and indexing pipelines. You can now have the preprocessing, indexing, and querying steps combined together in one pipeline with no restrictions. And while you can still create single-function pipelines, like indexing pipelines using ready-made components to clean up, split, and write the documents into a Document Store, or query pipelines that just take a query and return an answer, Haystack 2.0 offers multifaceted pipelines.
Branching
A pipeline can have multiple branches that process data concurrently. For example, to process different file types, you can have a pipeline with a bunch of converters, each handling a specific file type. You then feed all your files to the pipeline and it smartly divides and routes them to appropriate converters all at once, saving you the effort of sending your files one by one for processing.

Loops
Components in a pipeline can work in iterative loops, which you can cap at a desired number. This can be handy for scenarios like self-correcting loops, where you have a generator producing some output and then a validator component to check if the output is correct. If the generator's output has errors, the validator component can loop back to the generator for a corrected output. The loop goes on until the output passes the validation and can be sent further down the pipeline.

Data Flow
While the data (the initial query) flows through the entire pipeline, individual values are only passed from one component to another when they are connected. Therefore, not all components have access to all the data. This approach offers the benefits of speed and ease of debugging.
To connect components and integrations in a pipeline, you must know the names of their inputs and outputs. The output of one component must be accepted as input by the following component. When you connect components in a pipeline with Pipeline.connect(), it validates if the input and output types match.
Steps to Create a Pipeline Explained
Once all your components are created and ready to be combined in a pipeline, there are four steps to make it work:
- Create the pipeline with
Pipeline().
This creates the Pipeline object. - Add components to the pipeline, one by one, with
.add_component(name, component).
This just adds components to the pipeline without connecting them yet. It's especially useful for loops as it allows the smooth connection of the components in the next step because they all already exist in the pipeline. - Connect components with
.connect("producer_component.output_name", "consumer_component.input_name").
At this step, you explicitly connect one of the outputs of a component to one of the inputs of the next component. This is also when the pipeline validates the connection without running the components. It makes the validation fast. - Run the pipeline with
.run({"component_1": {"mandatory_inputs": value}}).
Finally, you run the Pipeline by specifying the first component in the pipeline and passing its mandatory inputs. Optionally, you can pass inputs to other components, for example:.run({"component_1": {"mandatory_inputs": value}, "component_2": {"inputs": value}}).
The full pipeline example in Creating Pipelines shows how all the elements come together to create a working RAG pipeline.
Once you create your pipeline, you can visualize it in a graph to understand how the components are connected and make sure that's how you want them. You can use Mermaid graphs to do that.
Validation
Validation happens when you connect pipeline components with .connect(), but before running the components to make it faster. The pipeline validates that:
- The components exist in the pipeline.
- The components' outputs and inputs match and are explicitly indicated. For example, if a component produces two outputs, when connecting it to another component, you must indicate which output connects to which input.
- The components' types match.
- For input types other than
Variadic, checks if the input is already occupied by another connection.
All of these checks produce detailed errors to help you quickly fix any issues identified.
Serialization
Thanks to serialization, you can save and then load your pipelines. Serialization is converting a Haystack pipeline into a format you can store on disk or send over the wire. It's particularly useful for:
- Editing, storing, and sharing pipelines.
- Modifying existing pipelines in a format different than Python.
Haystack pipelines delegate the serialization to its components, so serializing a pipeline simply means serializing each component in the pipeline one after the other, along with their connections. The pipeline is serialized into a dictionary format, which acts as an intermediate format that you can then convert into the final format you want.
Serialization formatsHaystack 2.0 only supports YAML format at this time. We'll be rolling out more formats gradually.
For serialization to be possible, components must support conversion from and to Python dictionaries. All Haystack components have two methods that make them serializable: from_dict and to_dict. The Pipeline class, in turn, has its own from_dict and to_dict methods that take care of serializing components and connections.
Updated about 5 hours ago
